
Cleaning, Assembly and Primering Plastic miniatures
Removing Paint from Miniatures
*updated April 30 2009
For most beginners mistakes often happen during the first few painting attempts. When that happens, then you will start considering what can be done to redo the steps again and make it right. Don't panic! Welcome to the underground way of removing or stripping paint from your miniatures.
Things you will need to remove or strip paint.
- painted plastic, resin or metal miniatures
- a glass/plastic jar with cover
- Dettol antiseptic soluton
- toothbrush
- washbasin
- rubber gloves
Caution: Wear rubber gloves when handling undiluted Dettol. Dettol may cause skin irritation. Avoid contact with eyes.
Just sit back and watch the video on how to remove paint from your miniature.
Repeat the whole process again to remove the remaining paint residue. As you can see the process is quite messy so strip paint only in the washbasin.
Washing up before PrimeringRemember to wash your figure with dish detergent before primering so as to remove grease and mould release agents that might be present on your figure. The presence of these chemicals might make primering and painting your miniature scale figure problematic, so let your figure take a bath before painting it. |
Cleaning mould linesCleaning up mould lines seemed to be the least important thing in painting miniature figures when I first started the hobby. How I was wrong! At least somehow I had missed this important point when I first picked up the hobby. Beginners tend to be impatient and immediately jump into the painting process and neglecting the all important step of cleaning up the mould lines. So take your time cleaning up your miniature figures if you want to avoid hiccups along the way. The end product would be worth the while. |
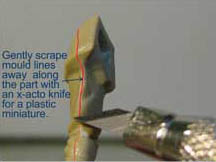 |
To clean the mould lines and flash, use an x-acto knife to carefully cut along the plastic miniature figure. Try to cut away from you to avoid injury. Inspect the miniature figure after cutting and run the tip of your index finger to feel for any more mould lines. You can also scrape gently along the mould lines to remove any more excesses.
Please be careful not to over scrape the details of the miniature figure. The only way to detect if you missed certain areas is after primering the miniature figure. Be sure to give one final clean up before moving on with the painting process.
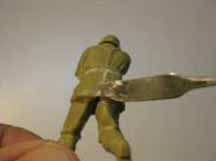
Cleaning mould flash for metal modelsMetal figures are generally made from lead and non-lead based alloys. Non-lead also as white metal have now began to replace lead miniature figures due to its non poisonous nature as compared to lead based. For white metal figures, you need a needle file and a wire cutter for removing mould flash. Generally it is much simpler to clean metal miniature figures as compared to plastic ones. |
AssemblyFor figures with multiple parts, you need to make sure each part fits nicely in its slot and more importantly secured in place. When two parts have small joining surfaces, sometimes applying superglue may not be enough, Just an accidental touch with your fingers and the joined parts may fall off. That may be very frustating while you are painting the miniature figure; an additional method to secure the parts is needed. In order to do that, I will use a technique called pinning. You need to drill two holes for each part of an assembly and fit in a wire or brass tubing to connect the two. Make sure the diameter of the drillbit is bigger than the brass tubing so they can be slotted into it . Once that’s done you can apply superglue to the drilled holes, brass tubing, joint surfaces and attach the 2 parts. |
Filling Gaps
 |
Another problem faced by modellers using plastic miniatures is the appearance of gaps after assembling two parts together. This is due to the parts not fitting as well as it should. This gaps may seem invisible at first, but after primering and painting, it may become an eyesore. We will always regret the fact that we did not tackle this issue much earlier till we are at a more advanced stage. |
One way to solve this problem is to use putty and fillers to cover those unsightly gaps. You can also use epoxy putty, but if you are on a shoestring budget, cheap putty is pretty fine. Use a scapel or penknife to smoothen the gaps filled with putty to finish off.
MountingIf your miniature figure do not come with a base like the Tamiya figure that I am painting, then you need to mount your figure so that you do not touch your ‘masterpiece’ after painting it and ruin the hours of work that you spend. Start by drilling the bottom of the feet of the figure using a pinvice drill about 2-3 mm deep. You will then insert a wire, toothpick(doublesided) or any other household items that you can find. This will be your mount. Apply some superglue to the wire or toothpick and slot it into the hole that you just drilled. Place your miniature figure model onto a cork or foam securley enough to make it stand upright to prepare it for painting. Another technique commonly used by modellers is gluing the miniature figure onto a base and using a bluetack to stick it onto a spraypaint cover. The spraycan cover acts as a mount during primering. |
PrimeringOnce the figure has been cleaned up, I normally used a blue tack or pin my figure onto a temporary base like a cork or spray can cap. I use a light grey Tamiya surface primer spray to prime my figure. I used to prime my figure by using a brush and paint, but I discovered that this kind of priming is too thick and will affect the details of the miniature figure. |
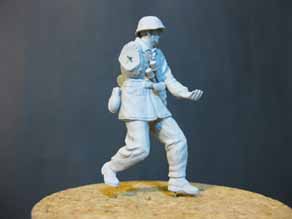 |
Some modellers use white or black primers and it depends on your preference. I choose grey because it is a neutral colour and it seems easier for me differentiate the highlights and shades of figure during painting.
Spray your miniature figure approximately 12 inches away and rotate it to give good coverage.
After this you may need to check the miniature figure again for mould lines and reprime the cleaned areas once again.
These are the building blocks before we begin painting our miniature figure. I hope modellers especially new ones weigh in this steps I mentioned above to have more successful and fulfilling painting session with your miniature figure.